5 Tips for Shooting Great Footage – MN Video Production Lessons
The appetite for online video continues to increase but it doesn't always make sense to hire someone to shoot your video. When you're doing it in-house, following a couple easy tips can make a huge difference in the overall quality. Here are 4 steps that will make your video footage sizzle!
Before we get into specifics, the overarching principle is to avoid shooting things the way we normally see them. You can’t approach it as if you just happen to be standing in a room and the video camera is an extension of your eyes. If you do, your footage will look dull and uninspired. So without further ado...
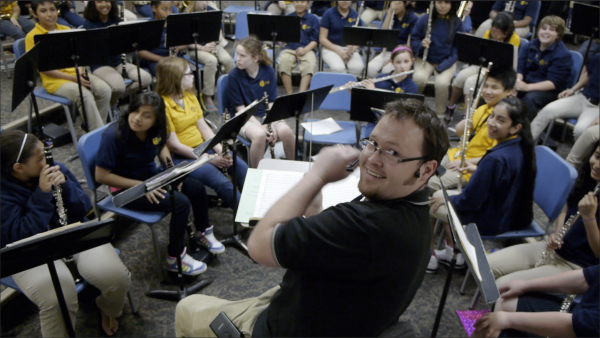
1. Vary the camera height
The quickest way to break out of the normal viewpoint is to raise the camera up high or down low. Here's a shot from a recent Minnesota video production. I stood behind the band instructor and held the camera as high as I could over his head. This perspective highlighted the connection between the kids and the instructor.
In this shot, I was drawn to the child lying on the floor with his iPad. There was something so cool about how relaxed and engaged he was. I laid down 10 feet behind him and put the camera on the floor. This perspective heightened the playfulness of lying on the floor while in a classroom.

2. Zoom way out
The human eye tends to fall in the middle of the focal length spectrum - things don’t appear super wide or narrow. So zooming way out (creating a wide view) creates a lot of visual interest because it's not how we typically interpret the world. In the shot below I zoomed out as far as I could with my camera to get the entire walkway into the shot. The wide perspective also gives the school and the clouds behind it a sense of grandeur.

3. Zoom way in
The flip side of this is to zoom way in (create a narrow view). Tight shots create a heightened focus and shine a light on fine details. Again, we don’t normally view the world like this so it provides a great contrast. The shot below is from a kid’s robotic class. I zoomed in to isolate the robot. This perspective adds character to the robot. Kind of looks like WALL-E's little brother.

4. Move the camera
Moving the camera while shooting is another way to add visual interest. The easiest way to do this is to pan the camera from one point to another. If you’re going to be shooting a lot of video, it definitely makes sense to buy a tripod. Most tripods have settings that allow you to control movement from side to side and up and down. Experiment panning both ways. I highly recommend getting a set of wheels for your tripod as well. You can get them for less than $50. Adding wheels will open up a whole other level of movement possibilities. Any time you have a smooth floor, you can push your tripod to create a very cool cinematic effect. Watching the video below to see a simple tripod pan and a tripod on wheels.
5. Create a sense of depth
The last way to add visual interest is by creating a sense of depth. To do this you want to be mindful of having a focused subject in the foreground while having a background that reveals a sense of room and space. In the shot below I focused on the first student and used the long row of students after him to create a sense of depth.
Give these a crack and let me know how it goes.